Your journey with Ultipa can begin right where you are. Leverage our tools to import or connect your existing data in various formats and populate your graphs effortlessly.
Available Tools
Loader in Ultipa Manager
The Loader module in Ultipa Manager supports data loading from various sources, featuring an intuitive user interface.
Complete guide →
Quick Example →
Ultipa Transporter
Ultipa Transporter is a cross-platform command-line tool designed for importing and exporting data to and from Ultipa.
Complete guide →
Quick Example →
Supported Data Sources
Files

CSV

JSON

JSONL
Relationals

MySQL

PostgreSQL

SQL Server

Oracle

snowflake
Graph Platforms

Neo4j

GraphML

RDF
Others

BigQuery

Kafka

Salesforce
Example: Import from CSV
This example demonstrates the process of importing from CSV files using Loader in Ultipa Manager.
Prepare CSV Files
Click to download the CSV files:
To understand the columns included in these files and the graph structure we're going to use, refer to Modeling: Relational to Graph.
Create the Graph
Before using Loader to import data into a graph, ensure that the graph is already created in the database.
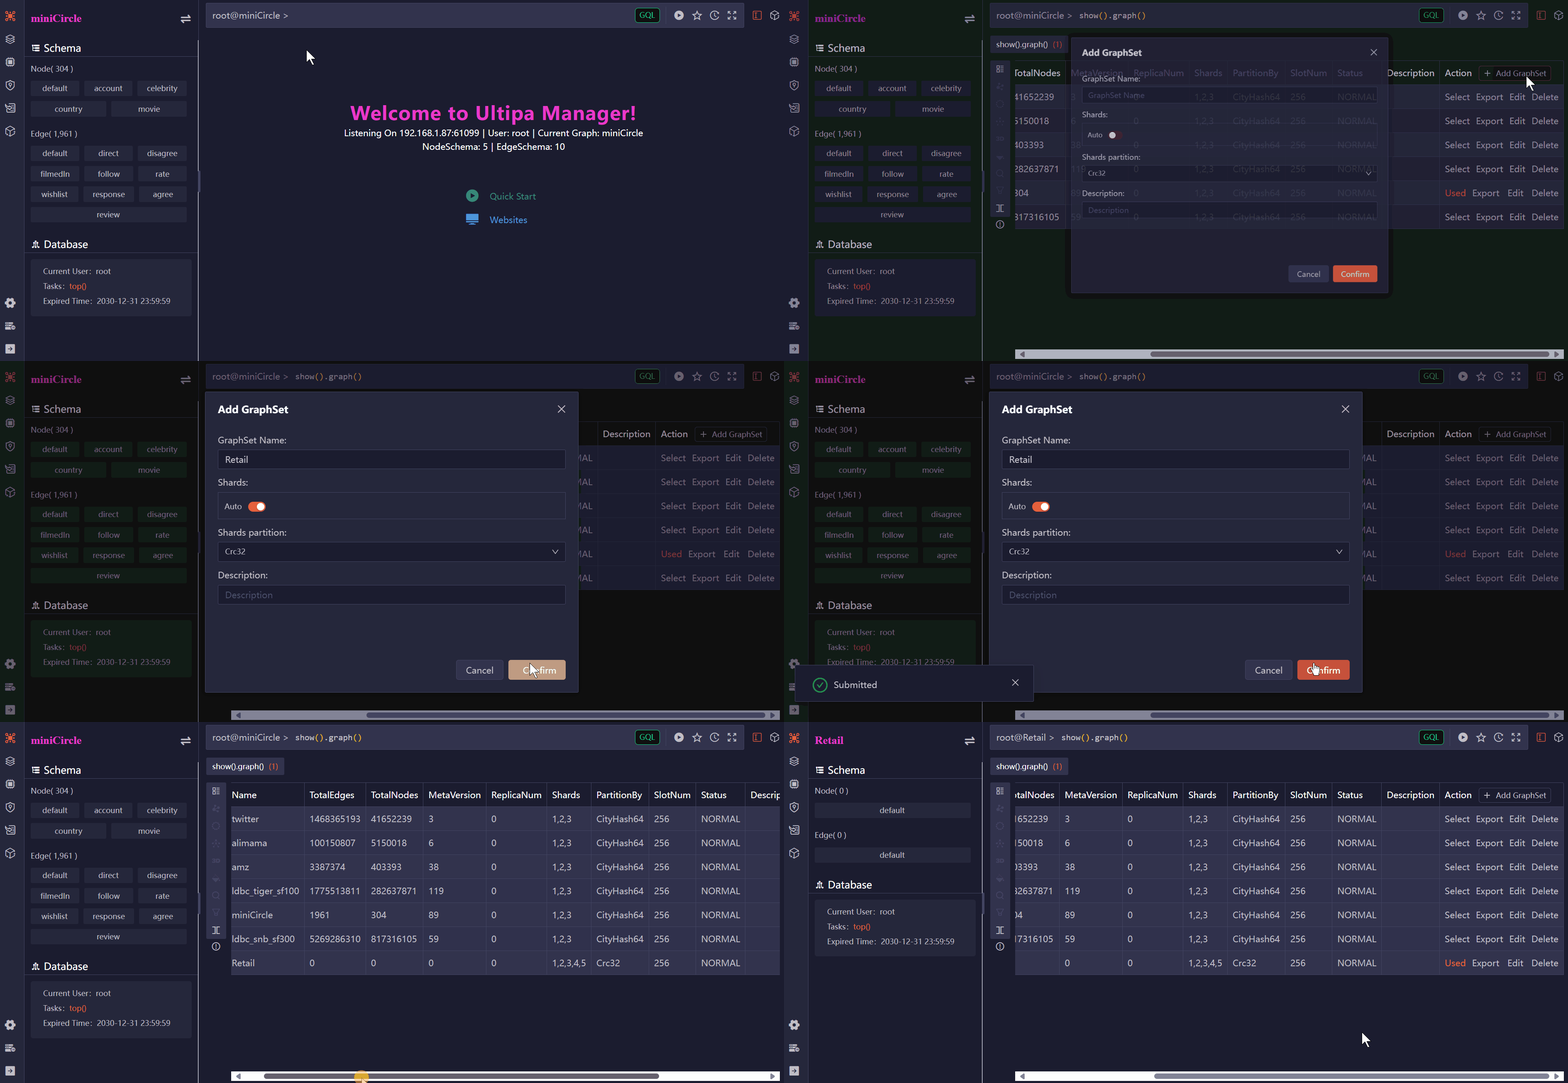 Create a new graph named Retail
Create a Loader
Navigate to the Loader module from the left-side menu and create a new loader. The default name is My Loader.
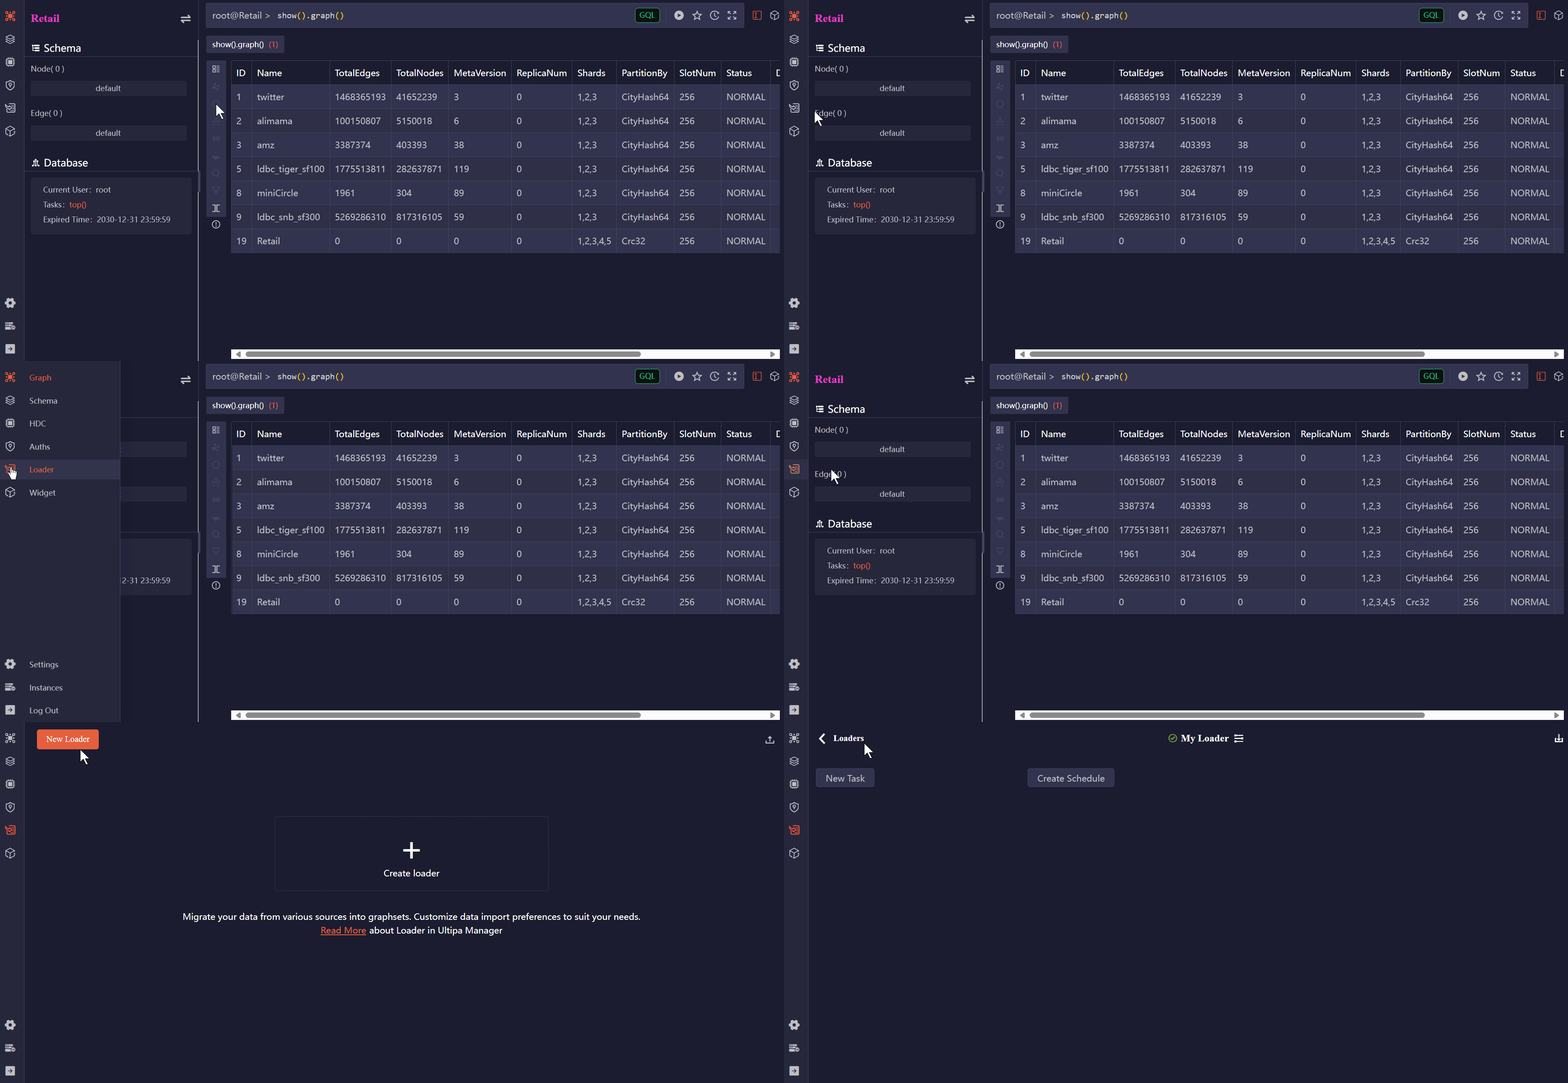 Create a new Loader
Create Task to Import Nodes
Hover on New Task and select CSV, then configure this task before clicking Import:
- Select
Retailunder Graph. - Enter
Customerunder Schema. - Upload the
Customer.csvfor File. - Uncheck Headless as the CSV file has the header row, which contains the property name and type.
- Update the Type of the property
cust_noto _id.
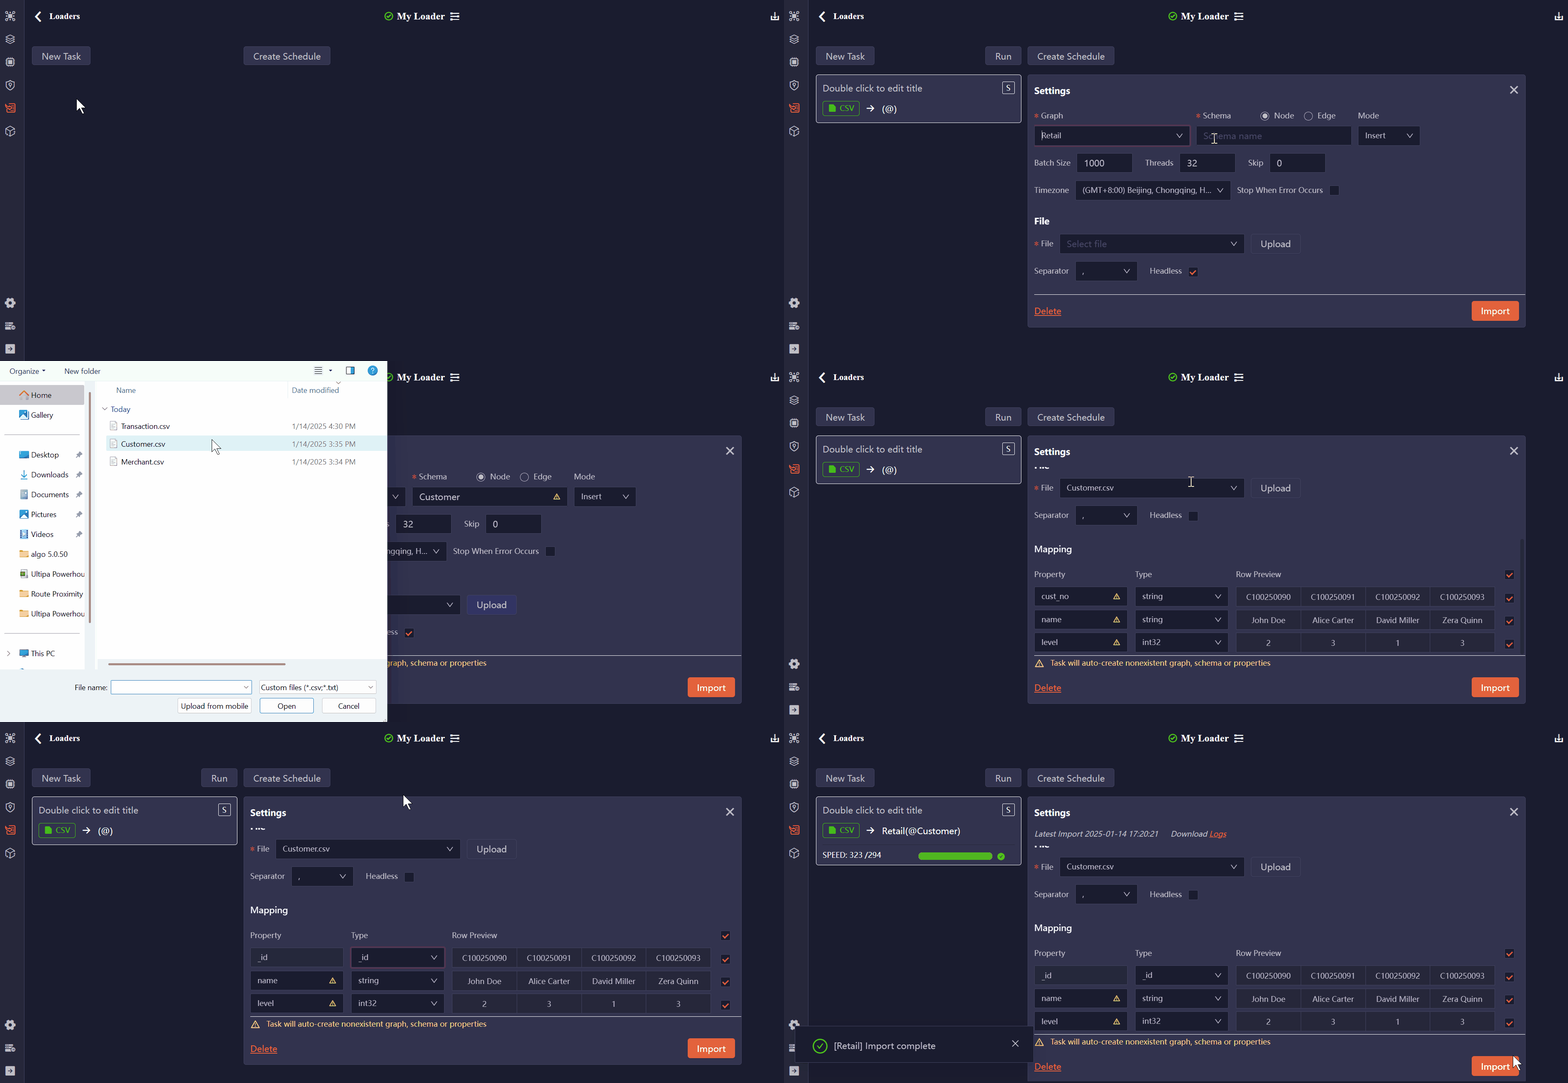 Create a Task to import Customer nodes
You may import the Merchant nodes in the same way. Update the Type of the property merch_no to _id.
Create Task to Import Edges
Hover on New Task and select CSV, then configure this task before clicking Import:
- Select
Retailunder Graph. - Select Edge and enter
TransfersTounder Schema. - Upload the
Transactions.csvfor File. - Uncheck Headless as the CSV file has the header row, which contains the property name and type.
- Update the Type of the property
cust_noto _from, andmerch_noto _to.
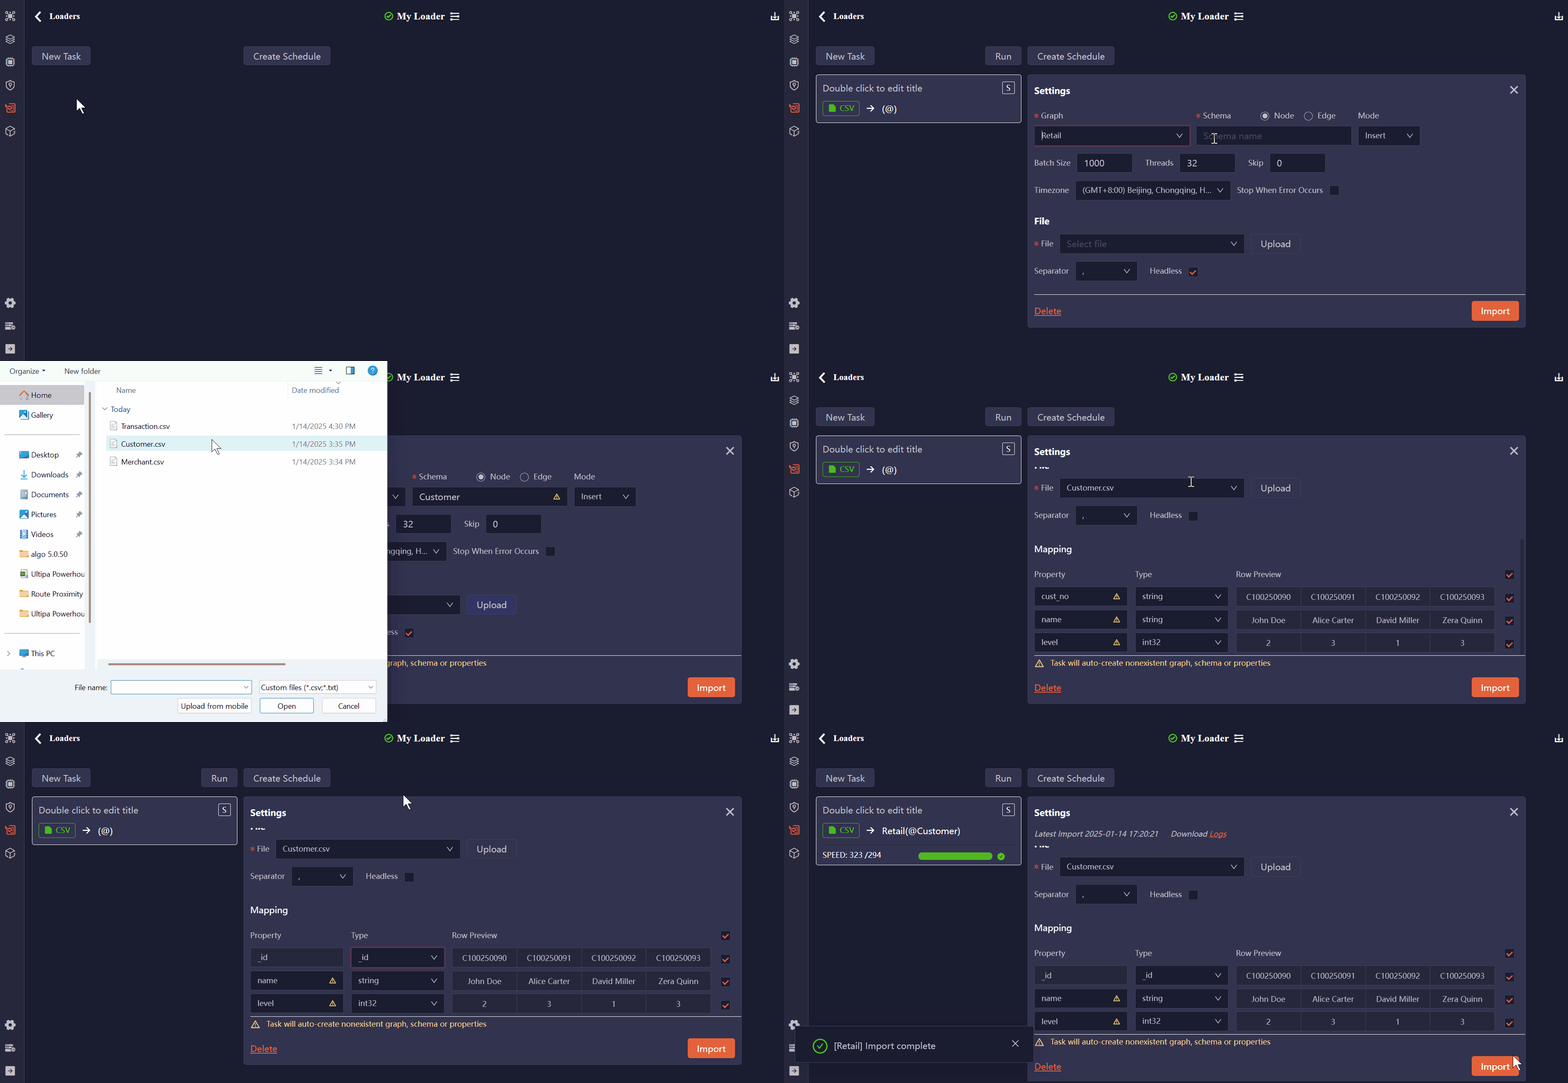 Create a Task to import TransfersTo edges
Verify the Graph
You may click Schema from the left side menu to verify the graph.
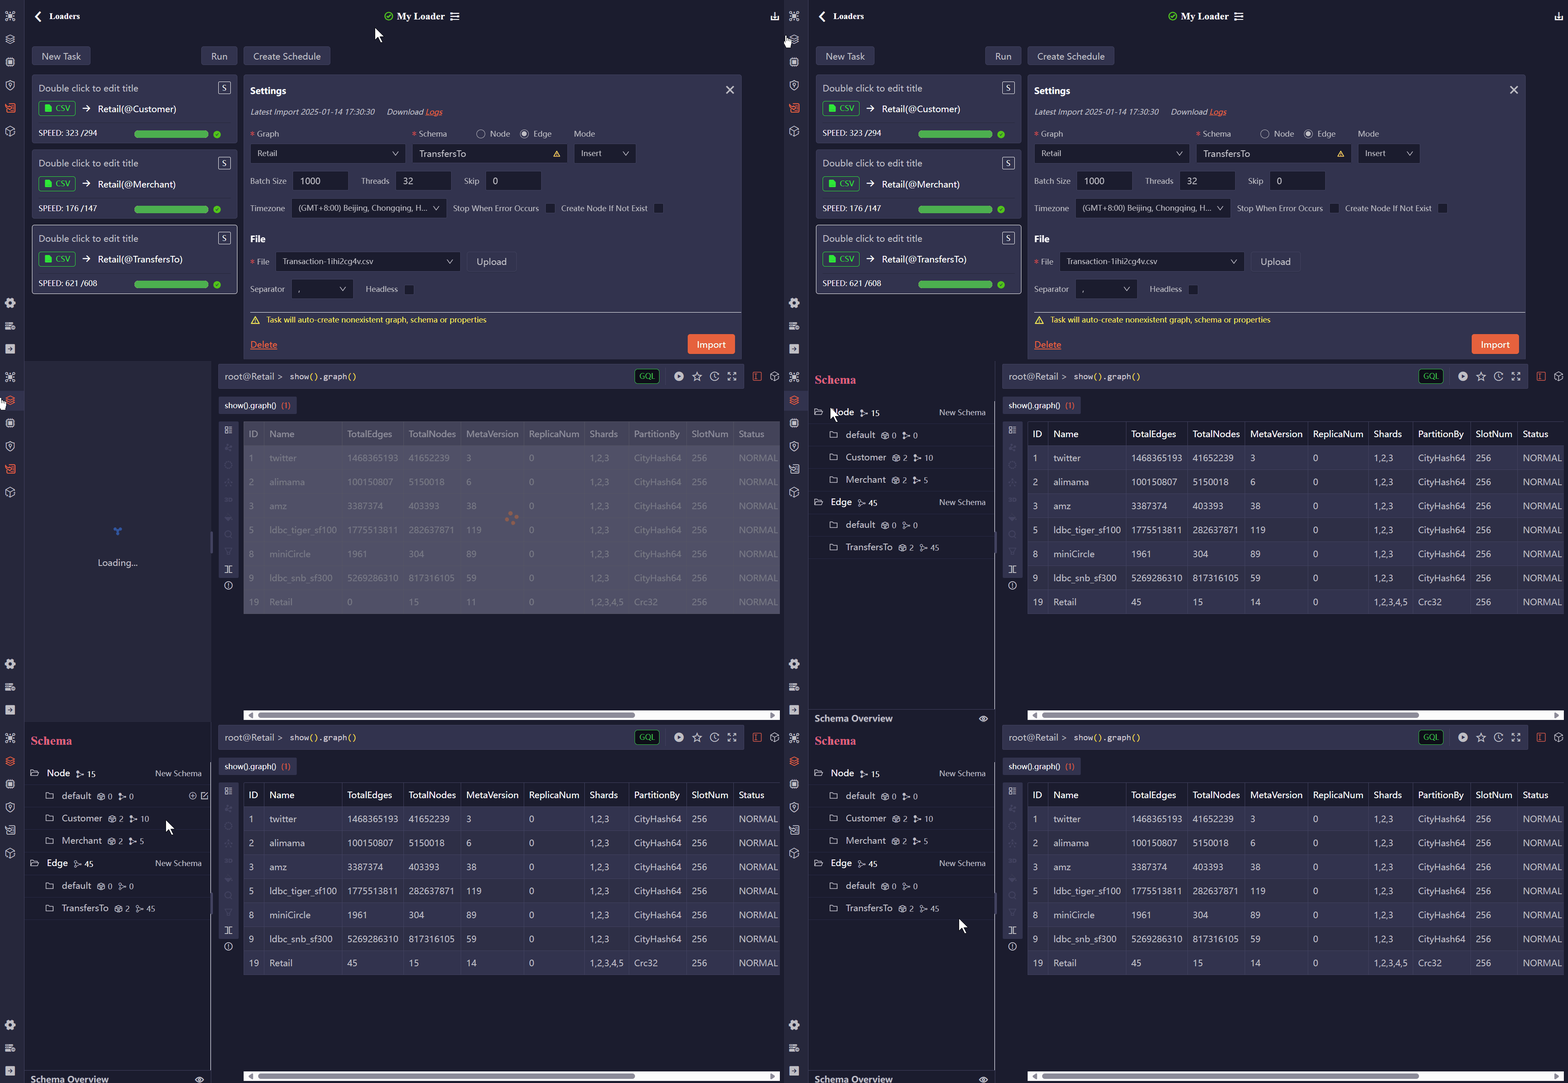 Verify the graph
Example: Import from Relational
This example demonstrates the process of importing from a MySQL database using Ultipa Transporter.
Download Ultipa Transporter
Download the Ultipa Transporter from here. The Windows version will be used for the following operations.
Prepare the Configuration File
Ultipa Transporter requires a configuration file to run. Below is an example. Please ensure you update it with your MySQL and Ultipa server information under the sqlDatabase and server sections. Click to download this config.yml file.
# Mode options: csv/json/jsonl/rdf/graphml/bigQuery/sql/kafka/neo4j/salesforce; only one mode can be used
# SQL supports mysql/postgreSQL/sqlserver/snowflake/oracle
mode: sql

# SQL server configurations
sqlDatabase:
  # Driver: choose from mysql/postgreSQL/sqlserver/snowflake/odbc/oracle
  driver: "mysql"
  # dsn: Data Source Name
  # If a DSN is provided, it will take precedence over individual connection settings
  # If no DSN is specified, the individual settings (host, port, dbname, username, and password) will be used for connecting to the database
  # mysql dsn: "<username>:<password>@tcp(<host>:<port>)/<dbname>?net_write_timeout=6000"
  # postgreSQL dsn: "user=<username> dbname=<dbname> password=<password> host=<host> port=<port> sslmode=disable"
  # sqlserver dsn: "server=<host>,<port>;user id=<username>;password=<password>;database=<dbname>"
  # snowflake dsn: "<username>:<password>@<orgname>-<account_name>/<db_name>/<schema_name>?warehouse=<warehouse_name>"
  # odbc dsn: "DSN=<dsn>;UID=<username>;PWD=<password>"
  # oracle dsn: "oracle://<username>:<password>@<host>:<port>/<dbname>"
  dsn: ""
  # Host IP/URI
  host: "192.168.1.88"
  port: "3306"
  dbname: "Retail"
  username: "root"
  password: "root"

# Ultipa server configurations
server:
  # Host IP/URI and port
  # If it is a cluster, separate hosts with commas, i.e., "<ip1>:<port1>,<ip2>:<port2>,<ip3>:<port3>"
  host: "10.11.22.33:1234"
  username: "admin"
  password: "admin12345"
  # The new or existing graphset where data will be imported
  graphset: "Retail"
  # If the above graphset is new, specify the shards where it will be stored
  shards: "1,2,3"
  # If the above graphset is new, specify the partition function (Crc32/Crc64WE/Crc64XZ/CityHash64) used for sharding
  partitionBy: "Crc32"
  # Path of the certificate file for TLS (optional)
  crt: ""

# Node Configurations
nodeConfig:
    # Specify the node type (schema) that the imported nodes belong to
  - schema: "Customer"
    # Write the SQL query to fetch data from the SQL database
    sql: "SELECT * FROM Customer"
    # properties: Map SQL query results to graph database properties
    # For each property, you can configure the following:
    ## name: The column name from the SQL query results
    ## new_name: The property name to which the column will be mapped; if unset, it defaults to the column name
    ## type: Supported types include _id, _from, _to, _ignore (to skip importing the column), and other Ultipa property types like int64, int32, float, string, etc.
    ## prefix: Add a prefix to the values of the _id, _from, or _to types; it does not apply to other types
    # If properties are not configured, the system will automatically map them based on the SQL query results
    # Columns mapped to system properties such as _id, _from or _to in the SQL results must be explicitly configured
    properties:
      - name: cust_no
        type: _id
      - name: name
        type: string
      - name: level
        type: int32
  - schema: "Merchant"
    sql: "SELECT * FROM Merchant"
    properties:
      - name: merch_no
        type: _id
      - name: name
        type: string
      - name: type
        type: string

# Edge configurations
edgeConfig:
  - schema: "TransfersTo"
    sql: "SELECT * FROM Transaction"
    properties:
      - name: trans_no
        type: string
      - name: cust_no
        type: _from
      - name: merch_no
        type: _to
      - name: time
        type: datetime
      - name: amount
        type: float

# Global settings
settings:
  # Delimiter used for the CSV files (applicable only in the csv mode)
  separator: ","
  # Define the path to output the log file
  logPath: "./logs"
  # Number of rows included in each insertion batch
  batchSize: 10000
  # Import mode supports insert/overwrite/upsert
  importMode: insert
  # Automatically create missing end nodes for edges (applicable only when importing edges)
  createNodeIfNotExist: false
  # Stops the importing process when error occurs
  stopWhenError: false
  # When importing a headless CSV and the number of configured fields differs from the number of fields in the file, set to true to omit or auto-fill data fields based on the configuration (applicable only in the csv mode)
  fitToHeader: true
  # Set to true to automatically create missing graphset, schemas and properties
  yes: true
  # The maximum threads
  threads: 32
  # The maximum size (in MB) of each packet
  maxPacketSize: 40
  # Timezone for the timestamp values
  # timeZone: "+0200"
  # Timestamp value unit, support ms/s
  timestampUnit: s
Run Ultipa Importer
Unzip the file you just downloaded in the previous step, and navigate to the folder that contains ultipa-importer.exe and ultipa-exporter.exe. You can also put the config.yml file into that folder. Open the terminal software (e.g., PowerShell) from that folder and run the following command:
./ultipa-importer --config ./config.yml
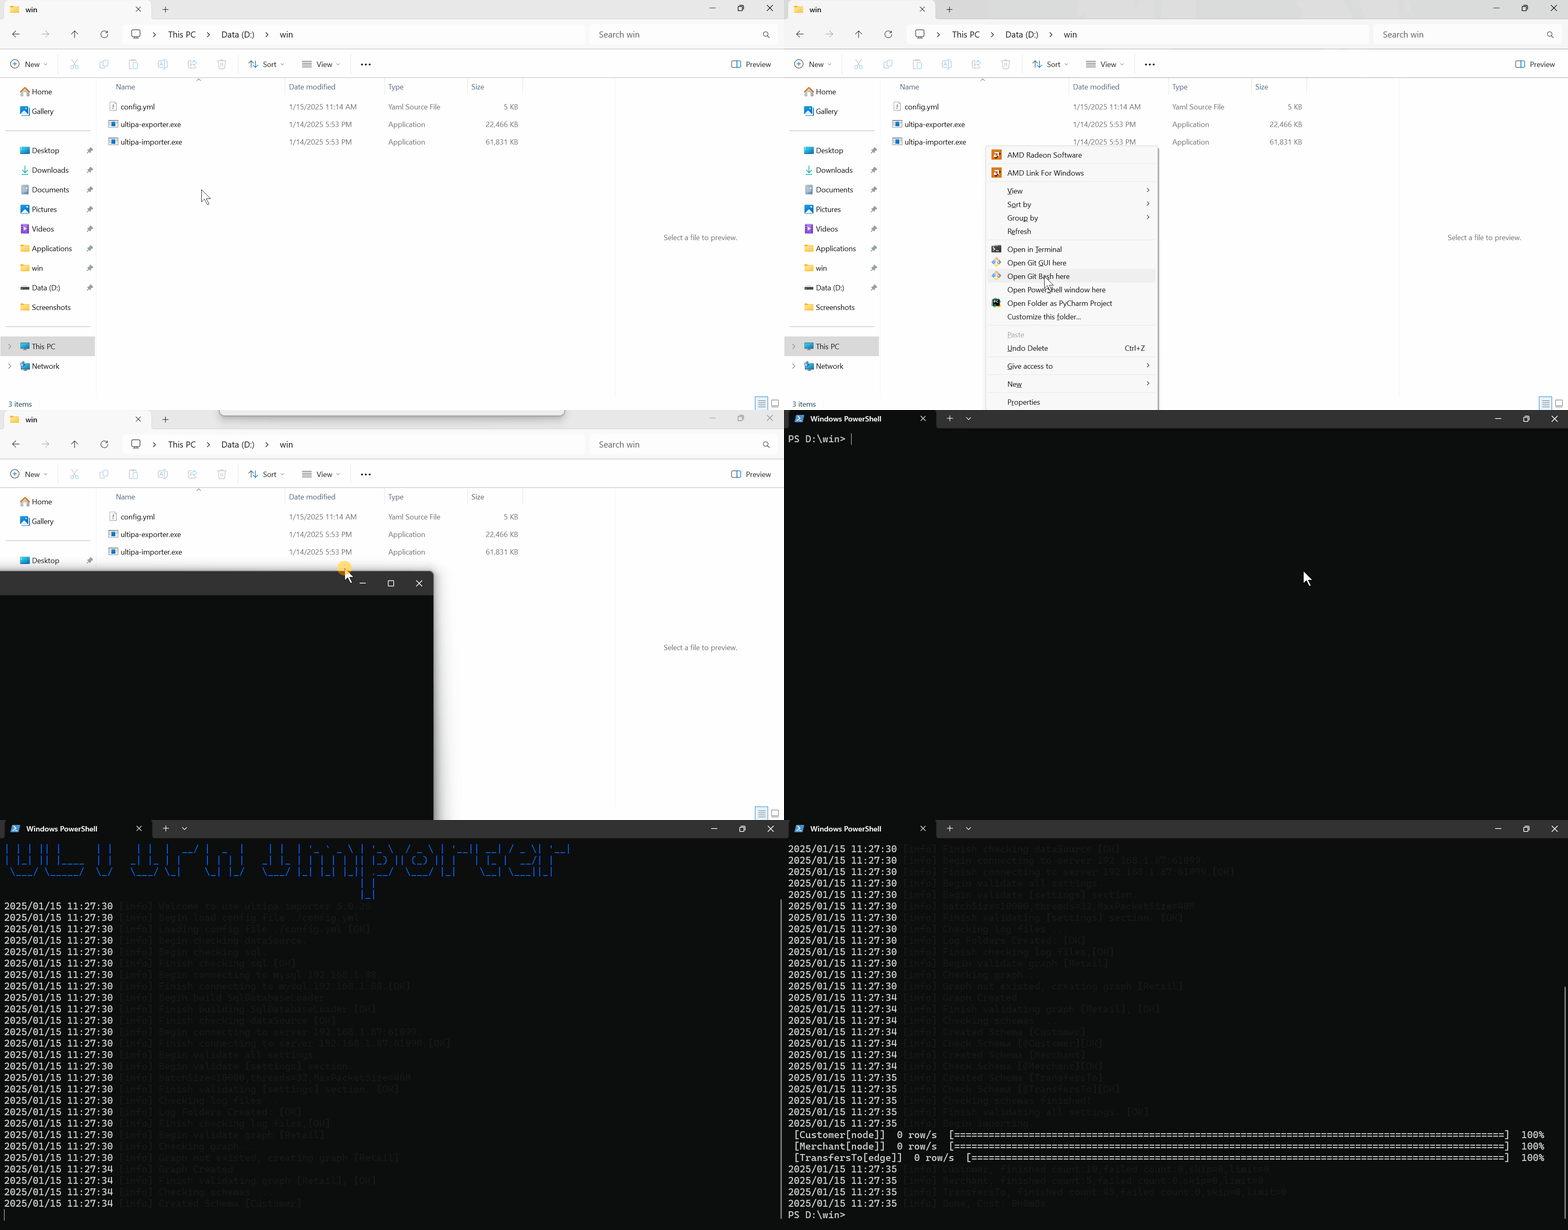 Import the graph using Ultipa Importer
Verify the Graph
You may use Ultipa Manager or other methods to connect to your Ultipa server to verify the graph just imported.

